Campaign settings
Campaign settings are the three choices that determine what the bidding model optimizes for: the objective type, the objective metric, and the target. The daily budget sits alongside them as the hard spend cap. This page walks through each setting, where it lives in the UI, and what values Catchbase accepts.
Before you start
- Editor role or higher.
- For revenue objectives and cohorted ROAS targets, an MMP must be connected (Adjust or AppsFlyer).
- For custom events as an objective metric, the event must already be configured in your MMP. See Custom events for prerequisites.
The three settings
Every campaign carries three related fields on the campaigns list.
- Objective type: Volume or Revenue. Volume campaigns optimize toward a cost-per-objective (CPO). Revenue campaigns optimize toward a target return on ad spend (ROAS).
- Objective metric: what the bidding model counts. Standard options are Installs (Tap-Through), lifetime Revenue, and the cohorted revenue windows Revenue D0, D1, D7, D14, and D30. A custom MMP event is accepted as a free-form event name.
- Target: the number the bidding model aims at. For volume, a currency amount per event. For revenue, a ROAS multiplier (300% means revenue of 3x spend).
The Apple Ads daily budget is the separate spend cap. It is stored in Apple Ads and written through when edited from Catchbase. The bidding model never exceeds the daily budget, and for volume objectives the target cannot exceed the daily budget either.
Setting the objective
The objective type and the objective metric are picked from a single dropdown on the campaigns list. The cell is the coloured badge in the Objective column.
- Click the badge on the campaign row. The dropdown opens with three grouped sections.
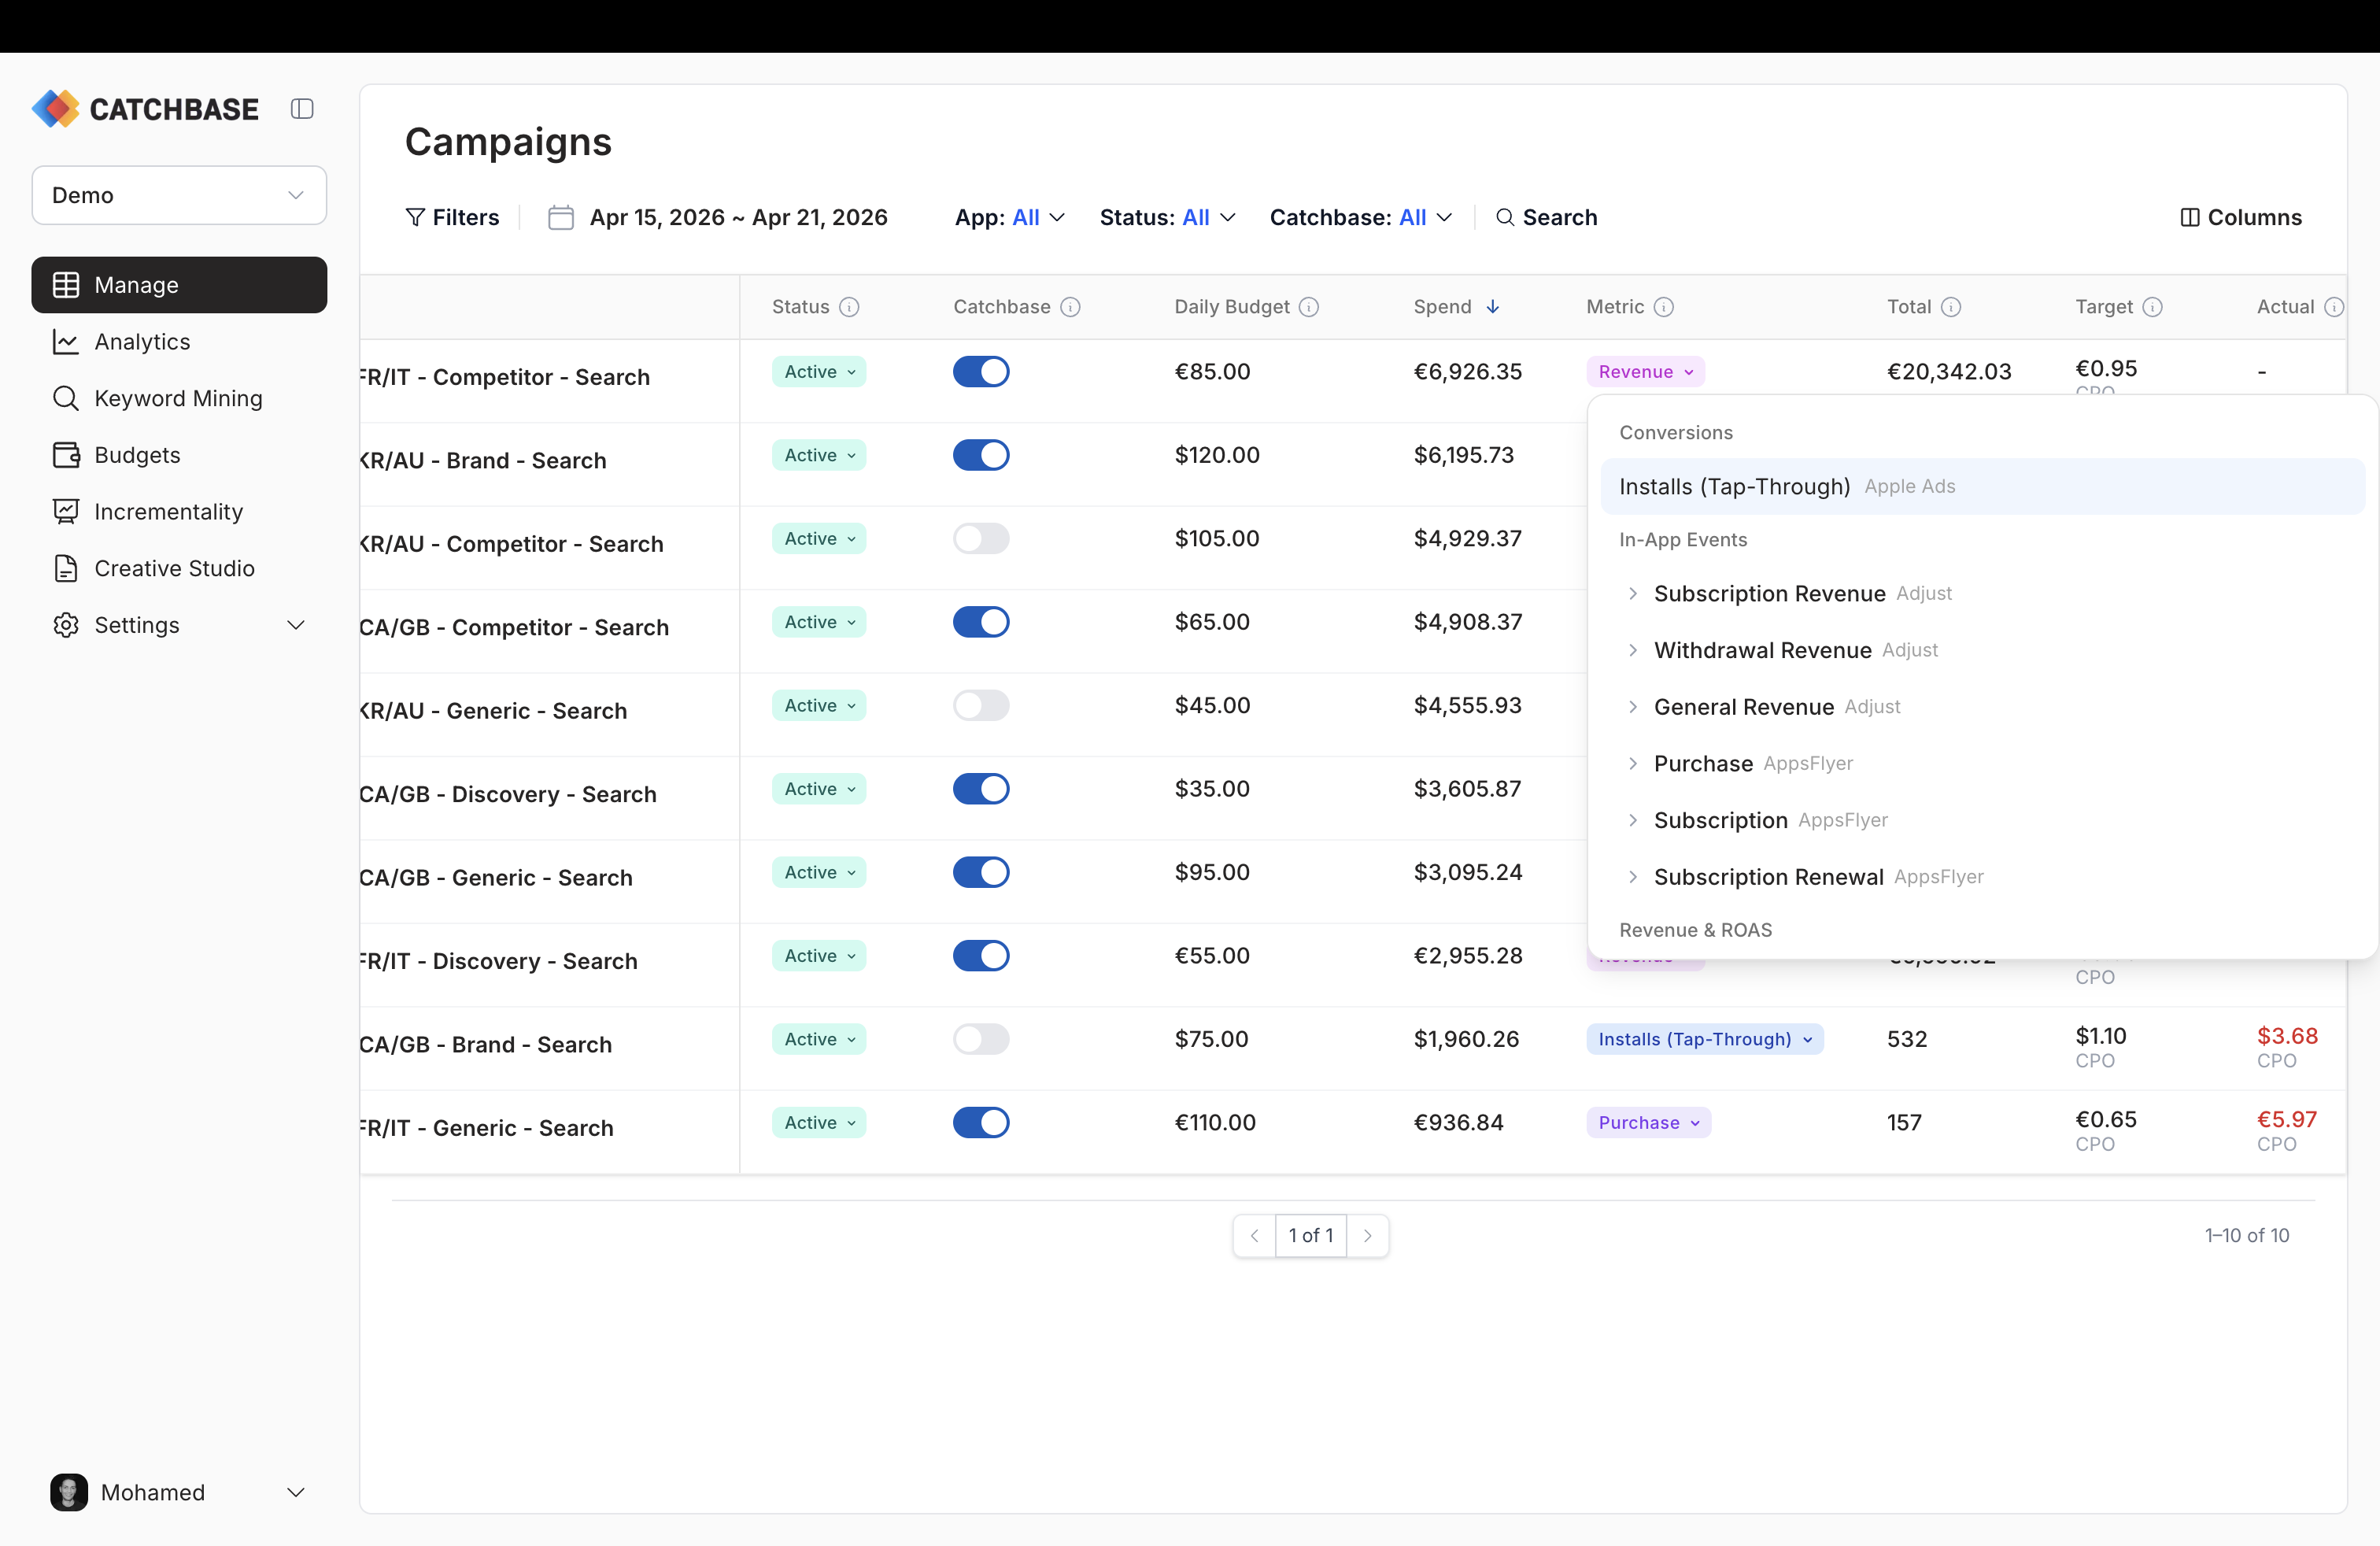
- Pick one of the options, grouped as follows.
- Conversions: a single entry, Installs (Tap-Through). Sets the objective metric to Installs (Tap-Through) and the objective type to Volume. Source is Apple Ads.
- In-App Events: one row per MMP event that your connected MMP reports. Each event expands to Count and Revenue sub-options. Count sets the objective type to Volume with the event name as the objective metric; Revenue sets the objective type to Revenue with the same event name.
- Revenue and ROAS: Revenue (lifetime) from the connected MMP, and if Adjust is connected, the cohorted windows Revenue D0, Revenue D1, Revenue D7, Revenue D14, and Revenue D30. All set the objective type to Revenue.
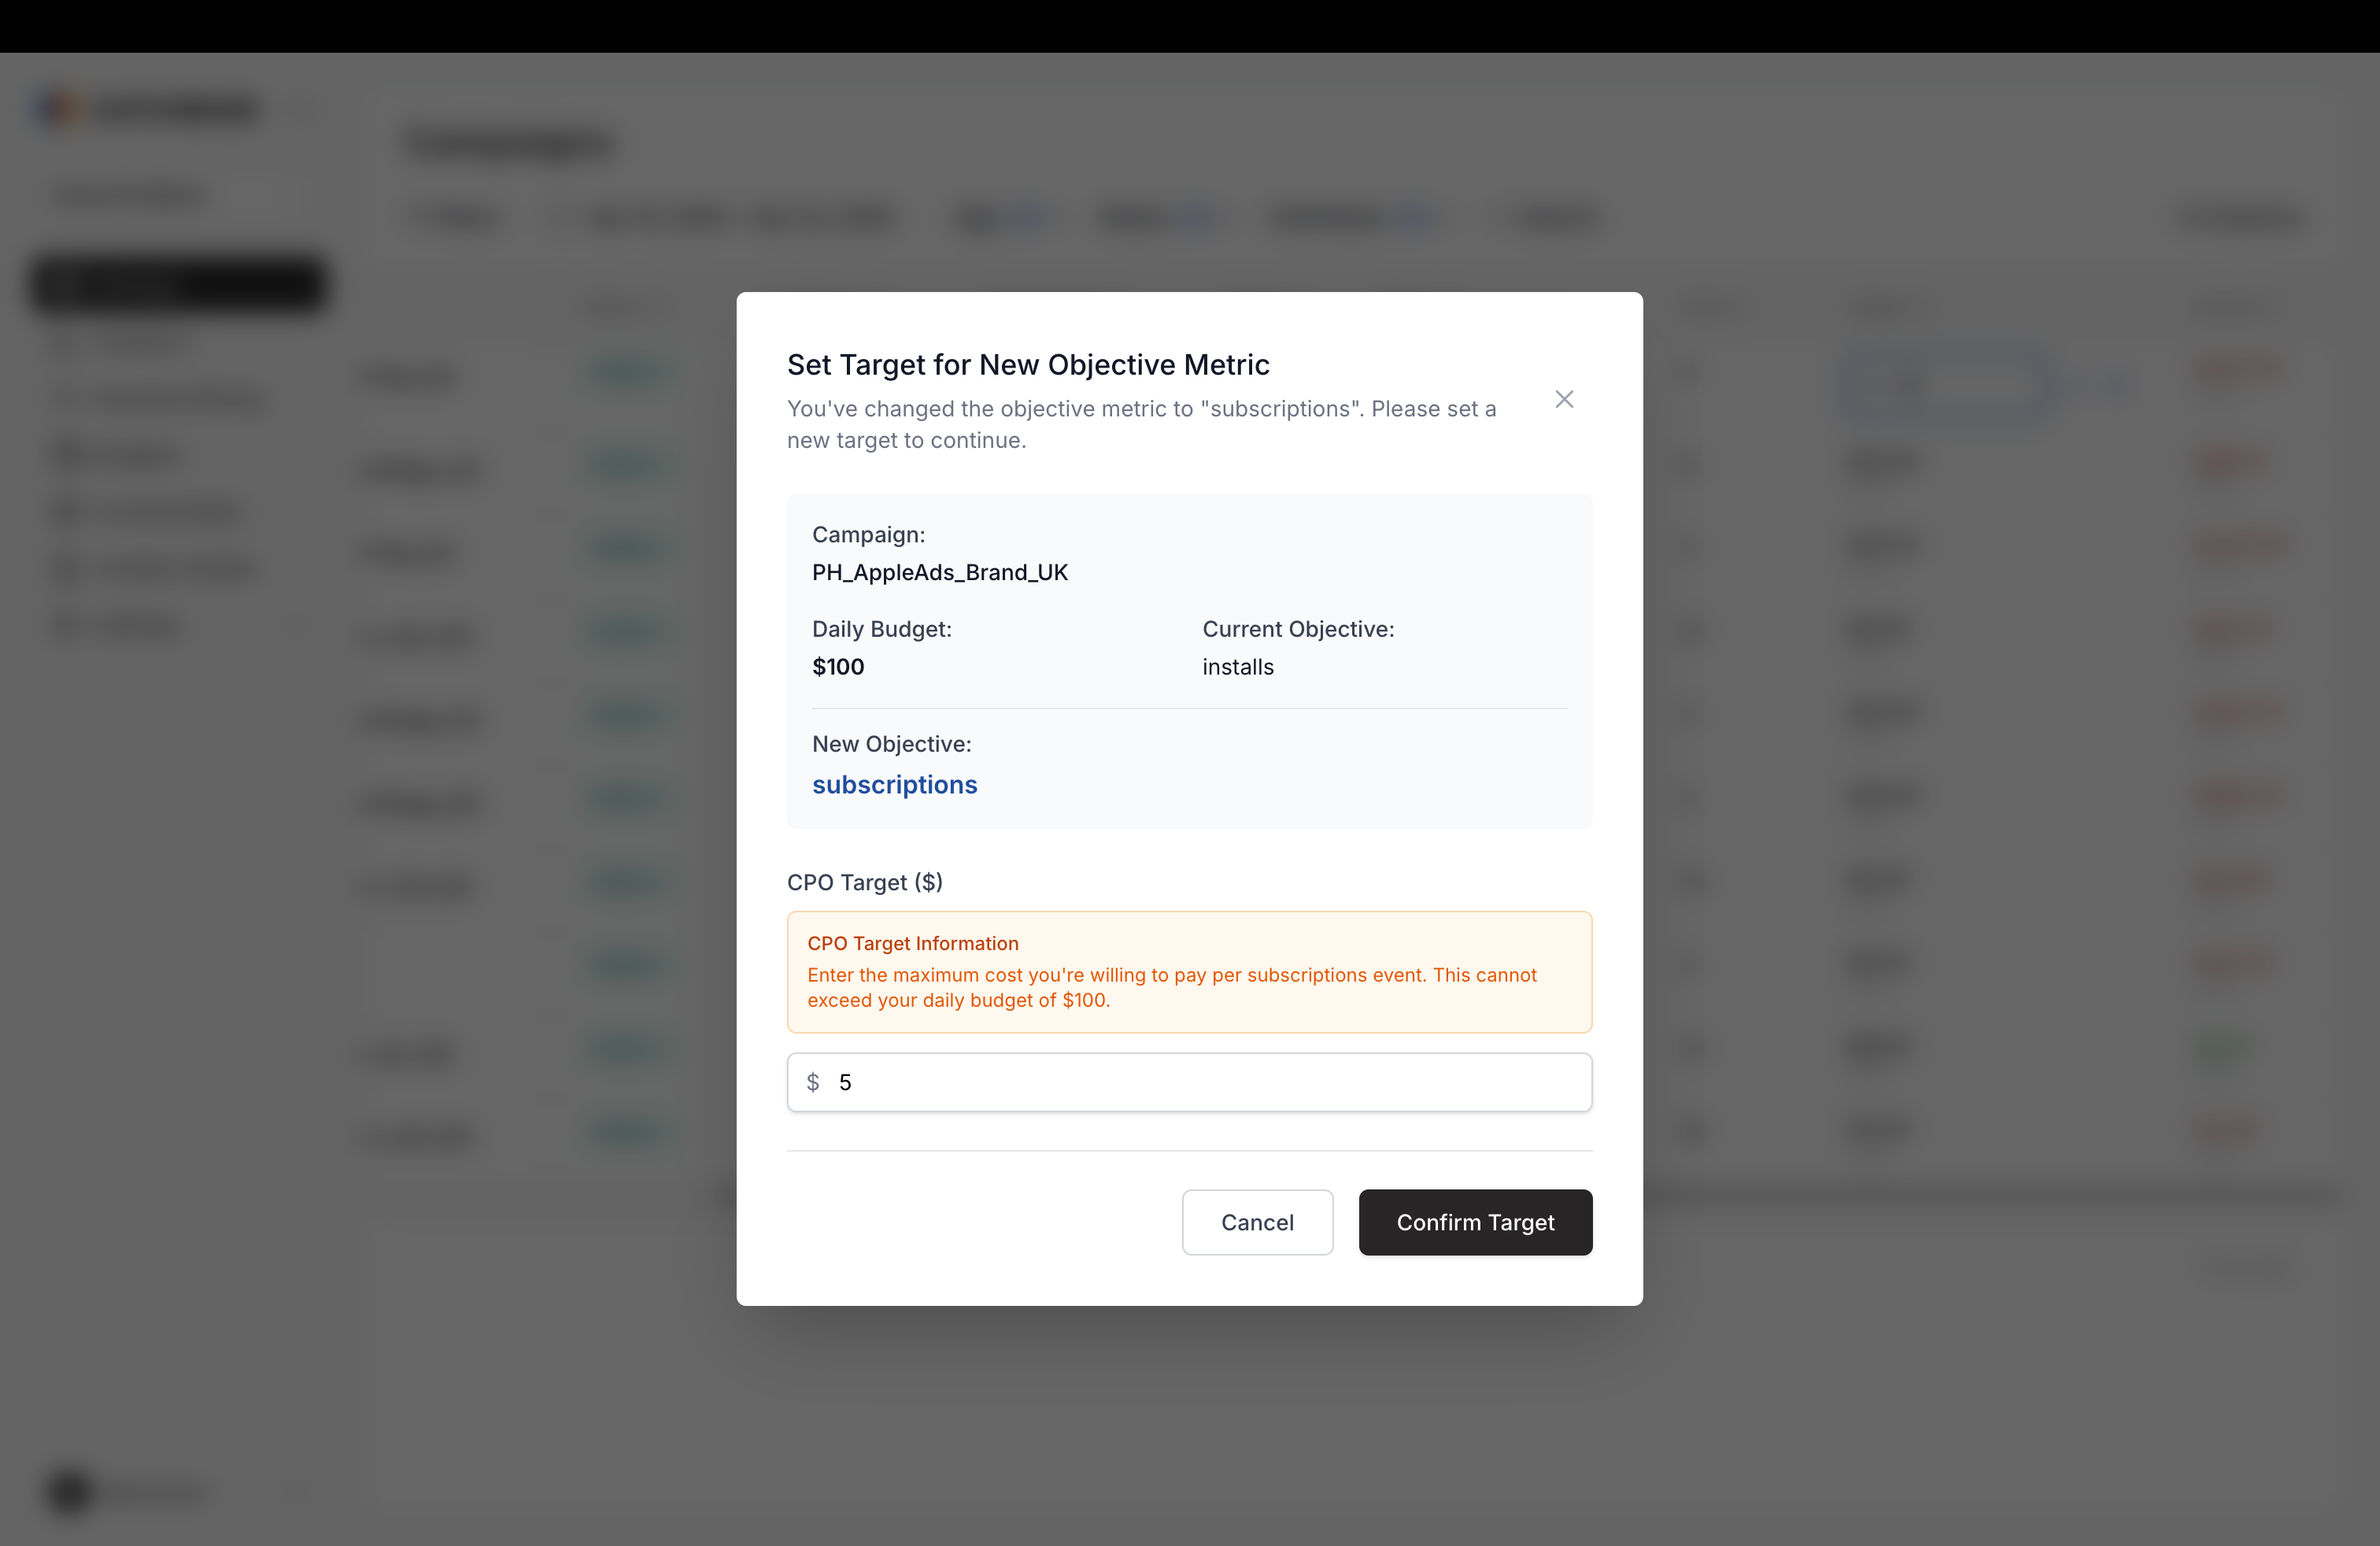
- If the campaign already has a target and the new choice changes the objective type, a dialog opens asking you to enter a new target. For revenue objectives, enter the target ROAS as a percentage (for example, 150% for 1.5x return). For volume objectives, enter the cost in the campaign's native currency.
Custom events
A custom MMP event is any event name your MMP tracks beyond installs and revenue, for example "signup", "purchase", or "subscription_start". To use one:
- Configure and actively track the event in Adjust or AppsFlyer.
- Wait for it to sync into Catchbase. AppsFlyer Partner events sync nightly and may take 24 to 48 hours after integration creation to appear.
- Open the objective dropdown. The event appears under In-App Events with a Count and Revenue sub-option.
See Custom events for the end-to-end configuration walkthrough.
Setting the target
The target is entered in the dialog that opens after picking the objective, or edited inline from the Target column on the campaigns list. Click the Target cell, type the new value, confirm. Validation rules on save:
- Volume objectives: the target must be positive and less than or equal to the daily budget.
- Revenue objectives: the target is entered as a ROAS percentage. No daily-budget constraint.
For multi-row updates, select rows and use the bulk action bar's Change target. Bulk target edits require every selected row to share the same objective type; the UI blocks submission otherwise.
Performance colour-coding
The Target column renders the actual CPO or ROAS next to the target, coloured against it. For volume objectives, actual CPO at or below target reads green; above target reads red. For revenue objectives, actual ROAS at or above target reads green; below target reads red. The colour is a quick read, not an alerting threshold: you will still want to weigh performance against cohort maturity and time-in-market before acting on a red campaign.
Recommended target hint
Where the bidding model has a recommendation for a campaign, a small hint reading "Recommended: X" appears next to the Target cell on the row. It is Catchbase's suggestion based on recent performance; accepting it is a one-click action but not automatic. You decide whether to take it.
Setting the daily budget
Edit the daily budget inline on the row's budget cell, or in bulk through the bulk action bar's Change daily budget. Reducing a budget below a keyword's current bid triggers the Budget Reduction Confirmation dialog, which explains that Catchbase will scale down the affected keyword and ad-group bids proportionally so they stay within the new budget. Confirm to apply both the budget change and the bid scaling together; cancel if you want to handle the bid side yourself.
How these settings drive the bidding model
The bidding model reads the objective type, the objective metric, the target, and the daily budget every time it bids. The objective type and metric tell it what to count; the target tells it how hard to push; the daily budget is the cap. See Bidding objectives for how each objective is interpreted and when to pick which one.